Safetypup® Costume Care & Use Guide
The Safetypup® Costume Care & Use Guide contains important information for anyone wearing the Safetypup® Costume or assisting as a Spotter. A printed copy of the guide is included with each costume, but if misplaced we’ve added this section to our website just in case.
Please be sure you’ve read and understand the Safetypup® Costume Care & Use Guide before wearing & washing the costume AND before being a Spotter.
Your NEW Safetypup® Costume
It’s a great opportunity to make an important impact on children and families in your community.
Please remember that the Safetypup® Costume must only be worn to programs or events that further public information, education, and awareness in child safety, law enforcement, and accident prevention.
Your new Safetypup® Costume is one of the finest costumes available to help law enforcement educate children & parents about child safety and accident prevention.
Any inappropriate use is strictly prohibited.
Costume Checklist
When you unpack or store your Safetypup® Costume, please inspect each piece and verify they are clean & in working order. Use this interactive checklist, tap an image to check off, or use version included in the Safetypup® Costume Care & Use Guide PDF.
Costume Assembly
1- Inserting the Waist-hoop
3- Jumpsuit & Cape
5- Safetypup® Head
Important Safety Precautions
For your own safety, please consult with your physician if you have any questions about your ability to wear the costume.
It can get HOT in the costume!
Only those who have read this guide and understand these precautions should wear the costume.

DO NOT wear the Safetypup® costume if you have any of the following medical conditions or restrictions:
- heart condition
- neck or back problems
- history of seizures
- sensitivity to heat
- breathing problems
- any other problem that could endanger your health
IMPORTANT!
IMMEDIATELY stop wearing the costume and seek medical attention if you feel:
- dizzy
- over heated
- nauseous
- faint
- or shortness of breath
Cooling Techniques:
- Limit wearing time, approximately 30minutes, especially during hot weather.
- Sip cool water SLOWLY if very hot.
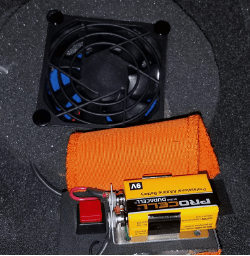
- Always use the cooling fan when wearing the costume.
The Spotter’s Job
A spotter (a.k.a. chaperone) is required to assist the costume wearer at ALL TIMES.
Basically, the spotter helps Safetypup® dress/undress and alerts them to any situation or hazard they may not be able to “spot” themselves.
Spotters should also be knowledgable in child safety & NCSC materials so they can speak for Safetypup®.
The spotter watches for:
- changes in the floor/ground
- inclines
- debris
- stairs or other obstacles
- young children approaching for a handshake or hug
- children asking questions
Never use children as Spotters!
Costume Storage

ALWAYS remove the batteries from fan unit before storing.
Failing to do this could damage the fans battery compartment & switch.
 1. Store your Safetypup® head in the upright position (chin down) with other items in the plastic bag they arrived in.
2. Place the feet in the plastic bags along side the head in the bottom of the box.
3. Replace the plastic bags if they become lost or damaged to keep everything separate and clean.
4. Never store parts wet, doing so could cause damage.
5. Always be certain that all parts are clean and completely dry before storing.
6. Avoid keeping costume in vehicle trunks or back seats for long periods of time.
7. Damage that could occur this way is not covered by warranty.
Cleaning & Maintenance
Limited Warranty & Service
6-Month Limited Warranty

NCSC offers a 6-month limited warranty that covers all parts and labor on the Safetypup® Costume and accessories. If during this time you discover a problem, please contact our costume department for assistance.
NCSC is not liable for any incidental or consequential damages/injuries in connection with or arising from the use of the costume or accessories. The buyer is responsible for training individuals that wear the Safetypup® costume.
Non-adherence to the care instructions may void the warranty.
Service and Parts Replacement
Please consult the costume checklist for names of parts and contact us for availability & costs. Replacement parts are limited. Our Costume Department will do its best to solve any problems you may experience, or answer any questions you may have about your Safetypup® costume. We hope to solve most problems over the phone.


